
Fundamentals to Get Started with Manual & Semi-Automatic Photography (Aperture, Shutter Speed, ISO)
Getting started with manual or semi-automatic photography, or even selecting a camera in the first place (which won’t be covered in this article) can be overwhelming. In case this is your very first time learning about manual photography, there will be many new terms that you probably have not come across.
In this article, I cover the very essentials when it comes to getting started with manual and semi-automatic photography. I will walk you through the main points that you need to know to get a head start in understanding your camera settings, so you can gradually build upon this!
If you are already familiar with manual and semi-automatic photography to some extent, you can still use this article to get an overview of the most important terms and concepts behind it — maybe you’ll even find some details that you weren’t aware of.
Let’s dive in!
1..Aperture
How Does It Affect the Photo?
The aperture has a major influence not only on the optical quality of the photo, but also on its composition. By setting an appropriate aperture, you can put a spotlight on individual subjects or the entire scene.
How Does It Work?
Your camera has a circular ‘opening’ (aperture) in front of the lens, which can be adjusted gradually from very wide to very narrow. The aperture controls how wide the circular blades in front of your camera lens are open; in other words, how large this circular opening is.
If you focus on an object with your eyes, you'll notice that the further you close your eyes, the less noticeable the background becomes — or in other words — it blurs, and your vision spotlights the object you're focusing on. It's a little different with the camera because the aperture has a circular shape, compared to the shape that is created when you slowly close your eyes, so to speak. Your eyes close at the top and bottom, but not at the edges. Nonetheless, this comparison can help in understanding the concept.
The more you close that circular opening on the camera, the more the objects that you're not focusing on will blur. Conversely, the more you close the opening, the more clearly you'll spotlight the object you're focusing on. Most of the time, that may mean blurring the background and focusing on an object closer to you. But you can also focus on an object in the background and blur the foreground, so to speak.
If you don't wish to focus on a specific object, you'll need to close the opening more, though not as much as possible, as this will lead to other problems regarding how crisp your picture will be. Just remember, as with everything, extremes are to be avoided!
How Do I Control This on My Camera?
You can control the aperture on your camera by setting the f-value. The larger the aperture opening, the smaller the f-number set on the camera. Conversely, the smaller the aperture opening, the larger the f-number.
For example, the aperture opening is smaller with an f-number of 11 than with an f-number of 5. The smaller the opening and correspondingly the larger the f-number, the greater the depth of field — i.e., the area of the photograph that is perceived as sharp — achieved. So, if you want the photo to be sharp from front to back, the f-number should be towards the larger end.
Note
Bear in mind that setting the aperture very shallowly (large f-value) means less light reaches the sensor, and this must be compensated for by adjusting the exposure time or ISO (read on for more information on these two concepts!) to achieve a well-lit photo.
Also, the depth of field depends on other factors too, such as the distance you are from your subject and the focal length, among other things. Don’t worry about this if you're just getting started. There's no need to overcomplicate things. Knowing how the aperture generally affects the photo is enough to explore the effects and then notice other influencing factors in practice!
In my opinion, aperture is the factor that you'll want to control most of the time compared to the other fundamental settings. Luckily, if you only want to control the aperture, you can photograph in the semi-automatic Av-mode (aperture priority mode) on your camera. This means that you will set the desired aperture value, and the camera will control ISO and exposure time for you! This is my commonly used mode — read on further below to find out why.
Examples
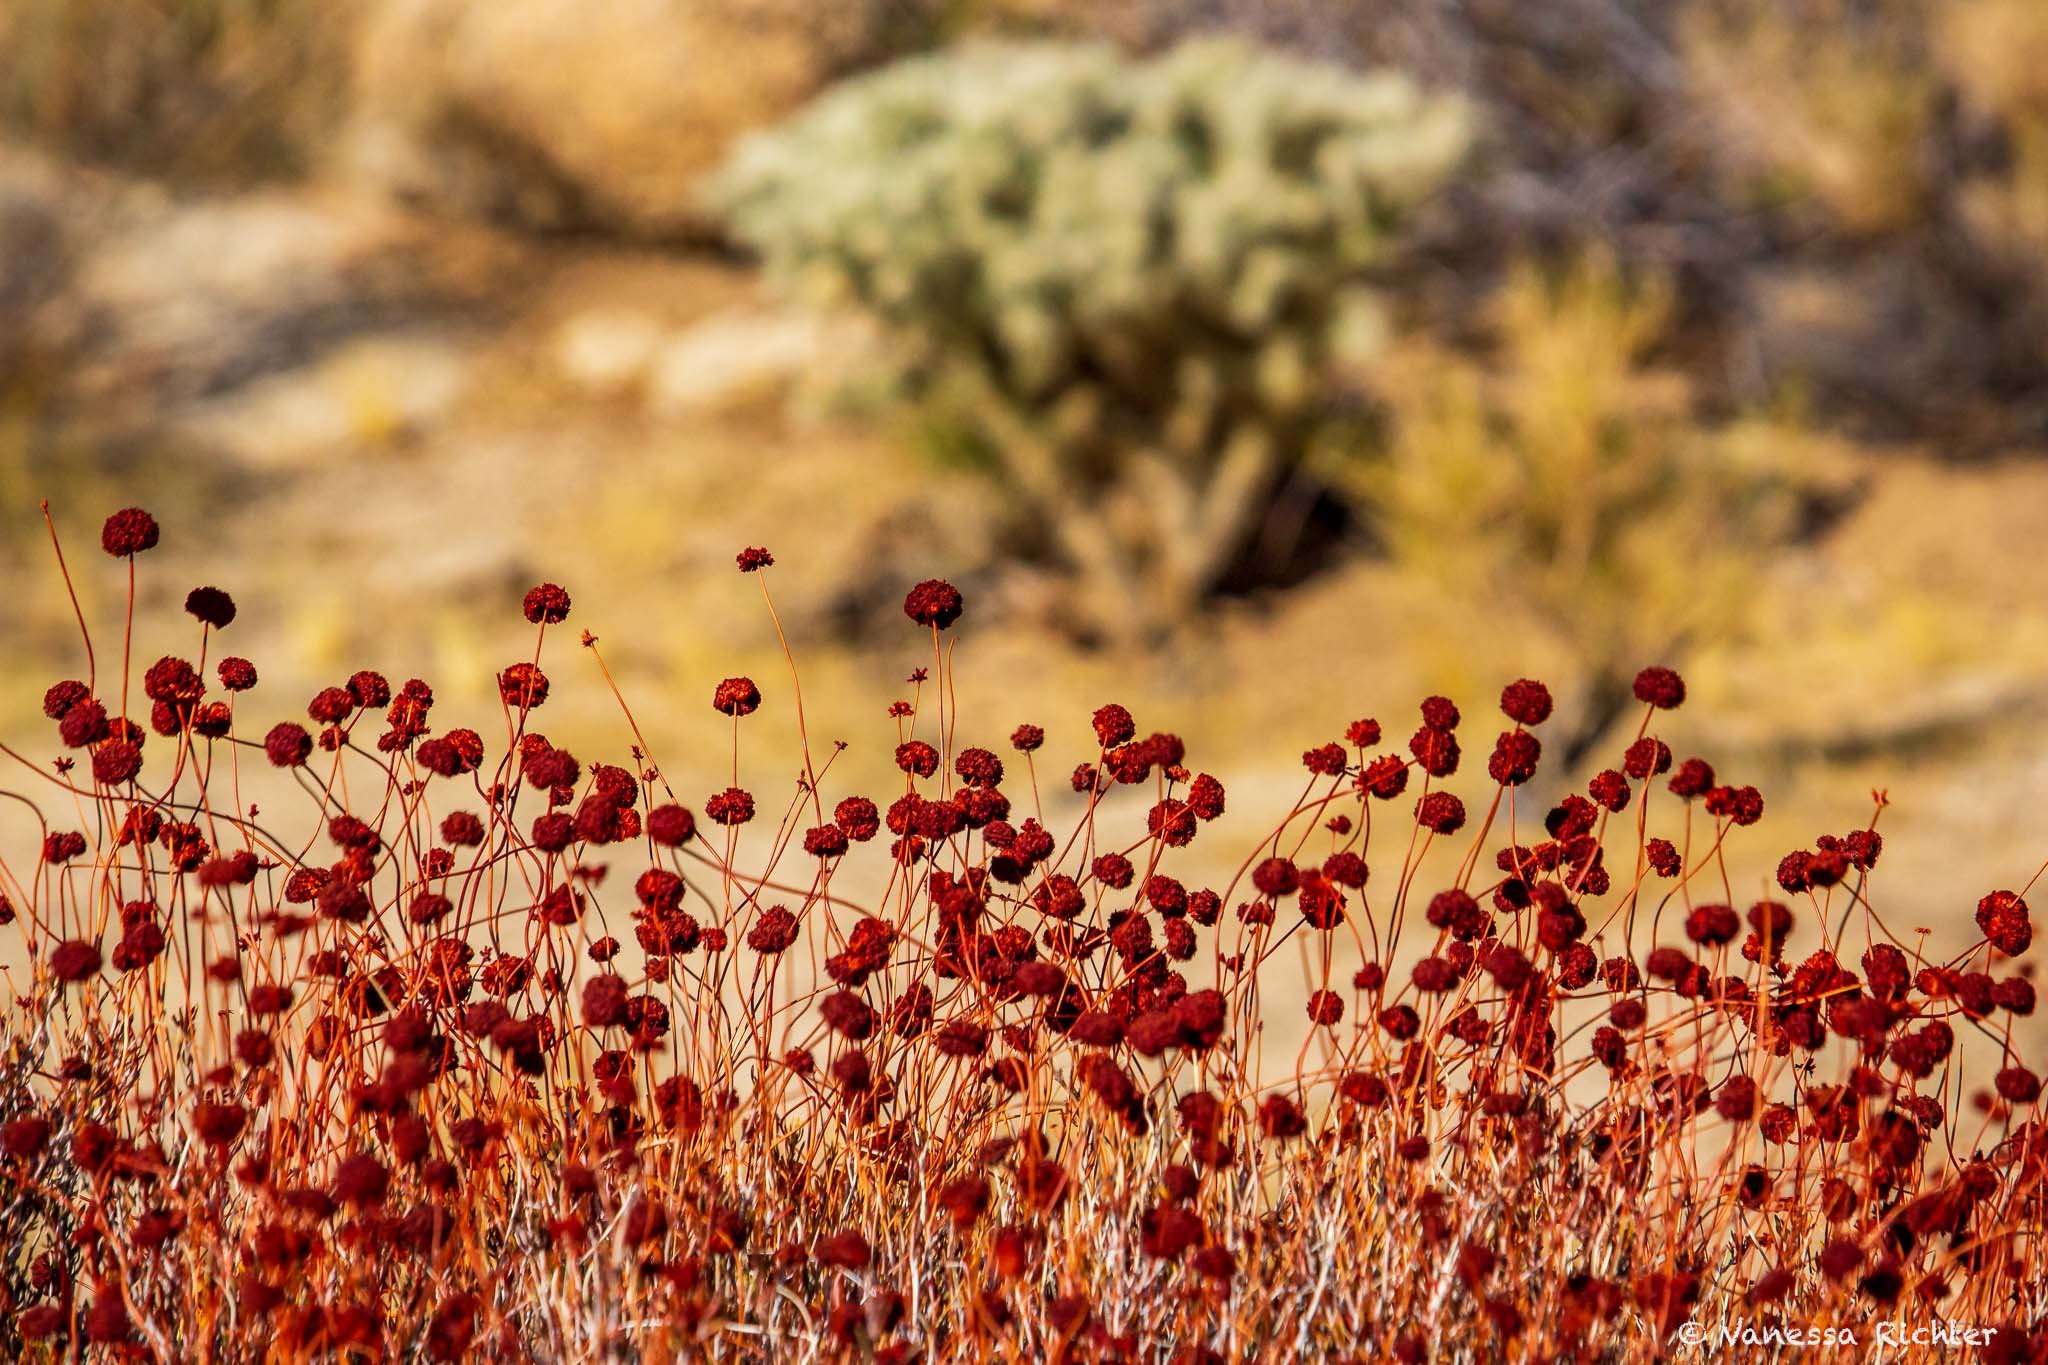
The upper photo was taken with a small aperture opening (large f-value; f/5.0 in this case). As you can see, the depth of field is pretty large, meaning that a large area from the foreground to a relatively far distance in the background is perceived as sharp.
The lower second photo with the same subject and very similar perspective was taken with an open aperture (small f-value; f/14 in this case). Here, the depth of field is narrow: only a small band of flowers looks sharp, whereas subjects behind and in front (notice, for example, the yellow flowers in the lower left corner) appear increasingly blurry — the further away from the focused, sharp area, the more blurry.
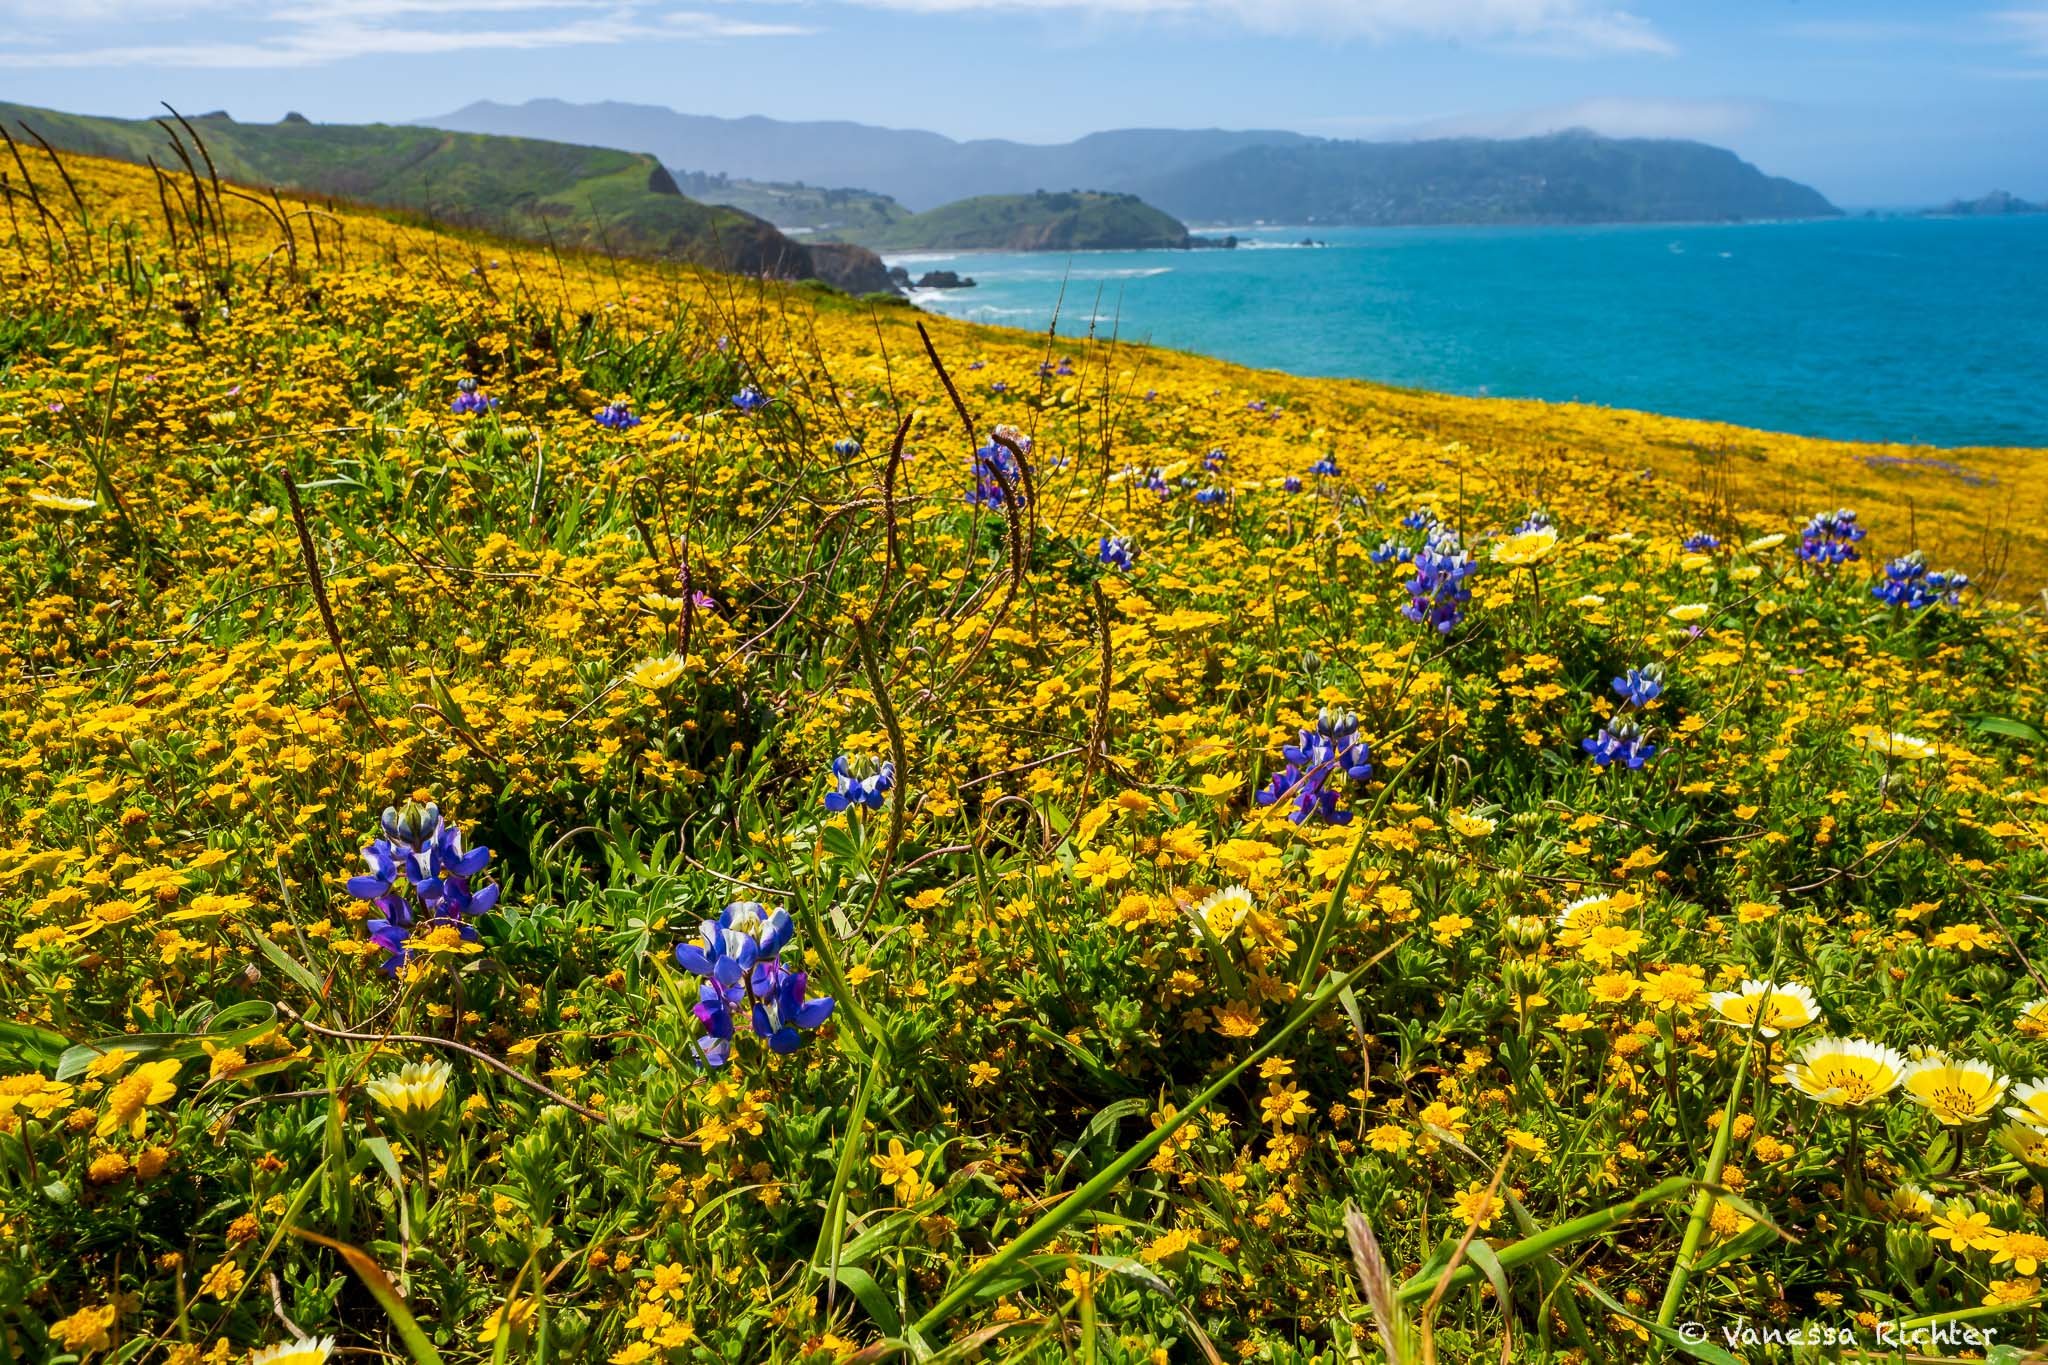
Below is another example of a small aperture (f/5.6). Here, I focused on the flowers in the foreground, which appear sharp, while the colors blend together in the background with a blurry effect.

2. Shutter Speed
How Does It Affect the Photo?
The shutter speed (also called exposure time or shutter time) primarily affects the lighting and the sharpness of objects in the photo.
From a technical perspective, setting the shutter speed appropriately is necessary to achieve a well-lit photo that is neither too dark nor too bright, as well as to achieve the intended sharpness, especially with fast movements.
On the other hand, it can be used specifically for creative purposes to achieve creative effects such as blurring water or other objects, creating light streaks, or freezing a movement or short event that is otherwise imperceptible to the human eye, such as the splashing of individual water drops.
How Does It Work?
The shutter speed controls how long the shutter is open and how much light falls on the sensor.
In terms of lighting, the darker it is, the longer the shutter speed must be. Conversely, the brighter it is, the shorter the shutter speed needs to be.
Similarly, when it comes to movements, the faster the movement, the shorter you need to keep the shutter speed so that the camera does not capture too much motion blur (if this is not intended).
How Do I Control This on My Camera?
If you photograph in Av-mode (aperture priority mode), you don’t need to worry about this at all — the camera will take care of it. This will be sufficient in many situations, when you just want to have a shutter speed short enough to capture an unblurred photo. This is usually nothing to worry about in most daylight situations.
If you do want or need to control for this, you can either do so in M-mode (full manual) by setting the shutter speed to an appropriate value (which can range from several seconds at night to 1/1000 seconds and shorter), or photograph in TV-mode (shutter priority mode), where the camera will take care of ISO and aperture for you.
Note
The longer the exposure time, the steadier the camera must be held in order to achieve a sharp result. A tripod is necessary for long exposure times.
While one or several seconds may seem short to us, it is incredibly long in terms of holding a camera completely still! A rule of thumb says that a blur-free hand-held result is possible up to a shutter speed that corresponds to 1/focal length. Thus, with a focal length of 100, you should be able to achieve a sharp image up to an exposure time of 1/100 of a second. However, the exact blur-free value also depends on the photographer themselves with regard to how steadily one can hold the camera.
Tips for Avoiding Camera Shake
Stabilize the camera from below with your hand and hold it close to your body.
Set a shutter delay of 2 seconds. This way, you can avoid the (minimal) shaking caused by pressing the shutter release button, which can cause blurring.
Take continuous shots.
Hold your breath when pressing the shutter button. This will prevent the raising and lowering of your chest from causing vibrations in the camera.
Examples
Long(ish) Shutter Speed

Sunrise at Joshua Tree National Park: shot with a shutter speed of 1/40 seconds, which I could still hold steady enough to produce a sharp image at a focal length of 20mm.
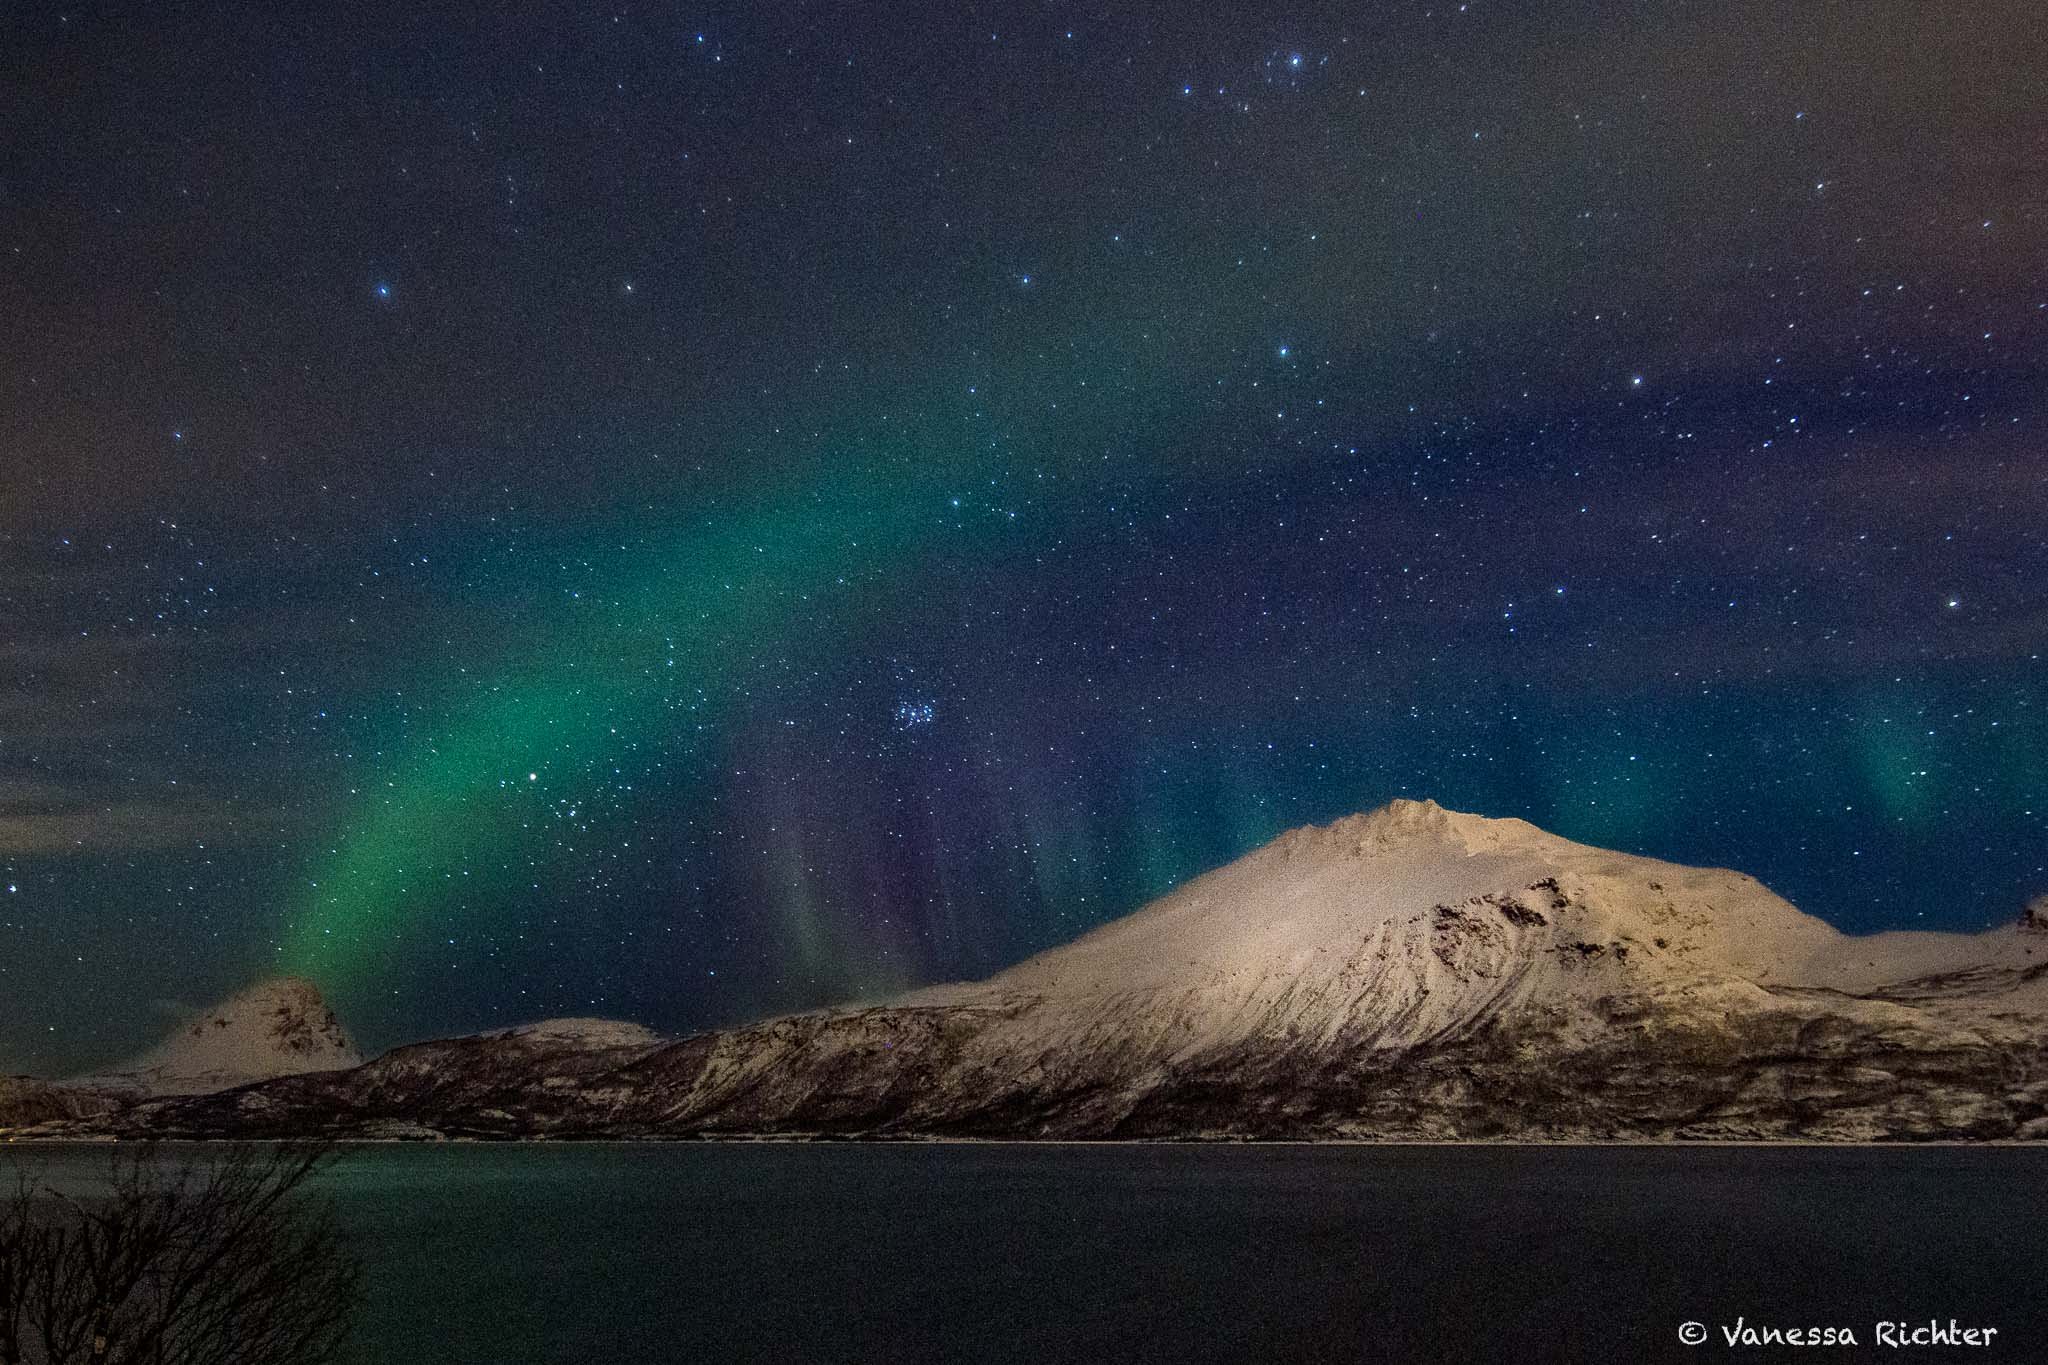
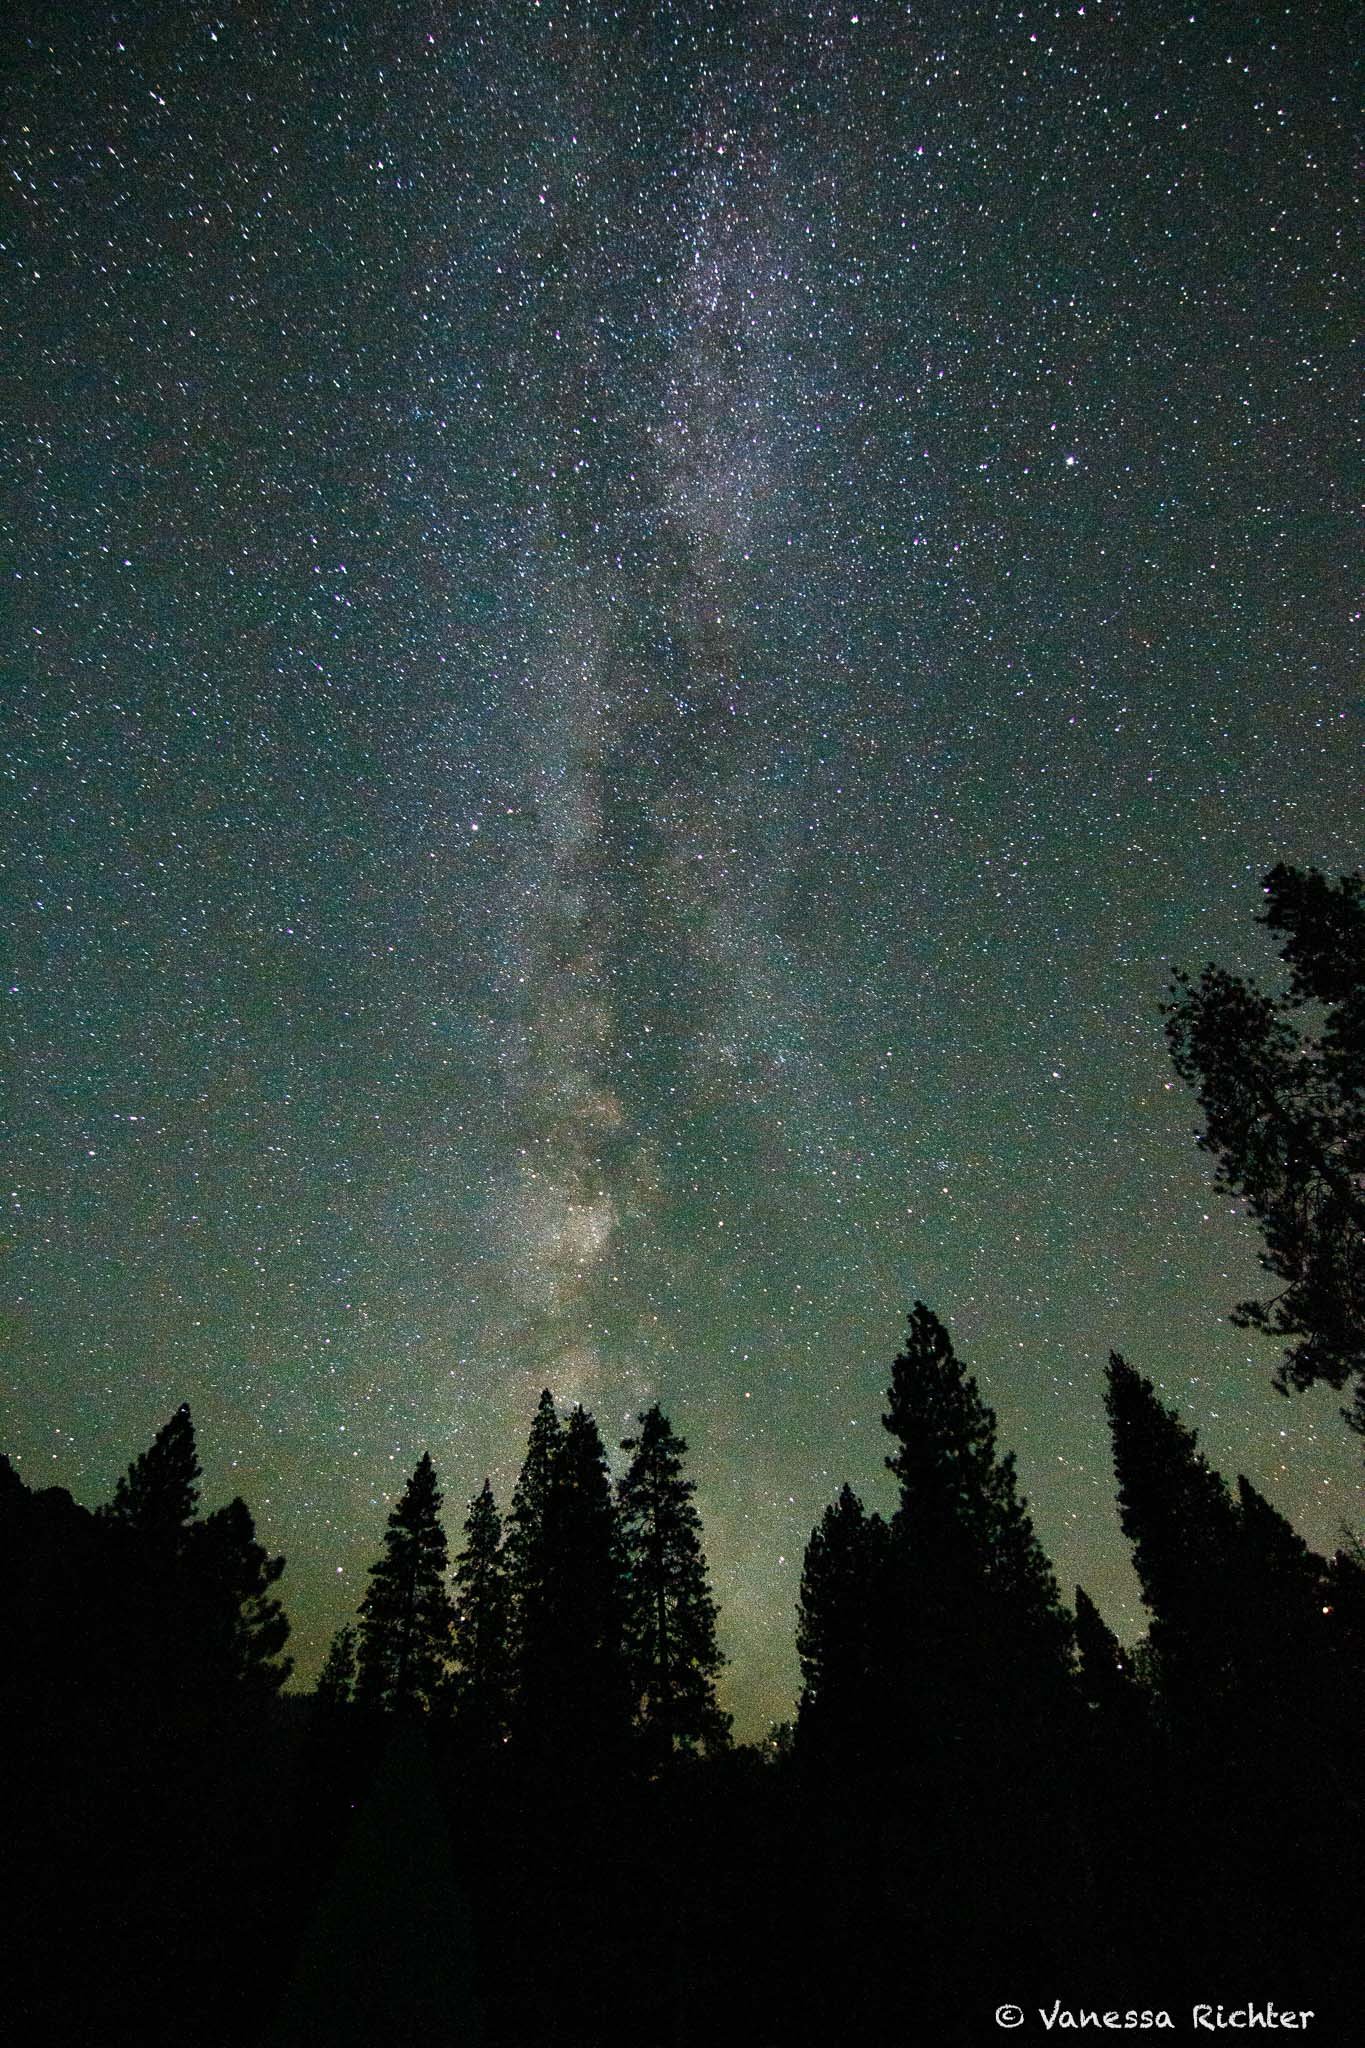
Aurora borealis in the night sky of Northern Norway: The shutter speed was set to 15 seconds, necessitating the use of a tripod to prevent total blur.
Shortish Exposure Time (Sunny Day)

Beautiful mountains in Kings Canyon National Park in daylight: Shot at a shutter speed of 1/1000 of a second, which can be held steady without any effort.
Creative Effects

A long shutter speed (here: 3.2 seconds) can be utilized to achieve effects such as light streaks, as seen in this picture. If you're interested in more creative effects, check out my article Make your Photos Special: Six Essential Stylistic Photography Effects.
3. ISO
How Does It Affect the Photo?
The ISO is primarily used as a tool to digitally brighten your image if necessary. A too high ISO may result in the picture looking grainy and less sharp. The lower the ISO, the less noise and sharper your photo will be!
How Does it Work?
The ISO value is related to the light sensitivity of the sensor. The higher the ISO is set, the more the signal is electronically amplified, resulting in a brighter image. Increasing the ISO can be highly beneficial in low-light situations, especially when a tripod is unavailable or when one of the other settings (aperture or shutter speed) is configured in a manner that limits the amount of light.
How Do I Control This on My Camera?
On your camera, you're typically able to set ISO values between 100 (or lower) and 12800 (and higher). In bright daylight, ISO values between 100 and 200 are usually sufficient. However, as light levels decrease, you may need to increase this value accordingly.
Note
Unfortunately, brightening up your photo using high ISO values comes with a loss of quality, as the random noise of the sensor increases with higher ISO settings. Noise refers to the ‘crackly’ or ‘coarse-grained’ parts of the photo, which are particularly noticeable in darker areas.
How High Is Too High?
This depends on the camera itself. Generally, from my experience with an APS-C sensor camera, images up to an ISO of 1600 are usable, but noise is significantly noticeable above ISO 800 (this is my subjective opinion using a Canon EOS 100D). Of course, this is also a matter of personal preference and depends on the specific photo. The level of noise that one perceives as acceptable varies from person to person.
With a larger format camera (full-frame), significantly higher ISO values can be used without significant noise disturbance. However, such cameras are also much more expensive and heavier due to the larger sensor, although there have been improvements in weight reduction in recent years.
The good news is that you can somewhat correct for noise in the photo during editing. You'll lose some sharpness when denoising, but if you don’t need to correct too much, you'll be able to restore some of that sharpness during editing as well!
Examples
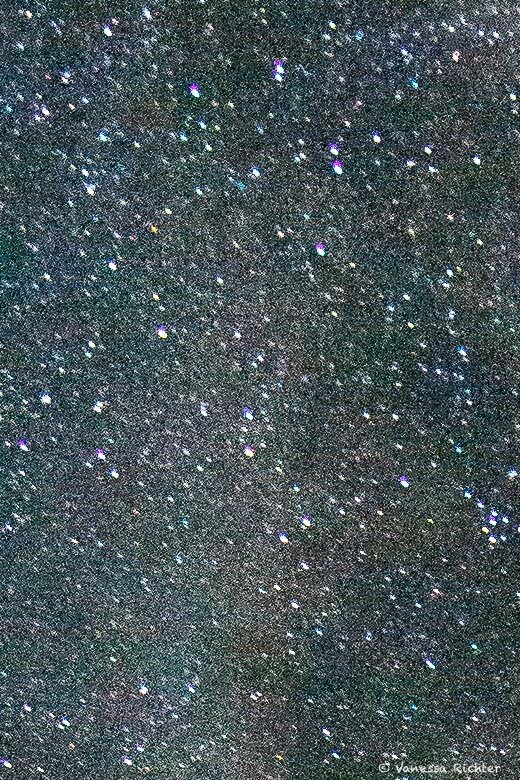
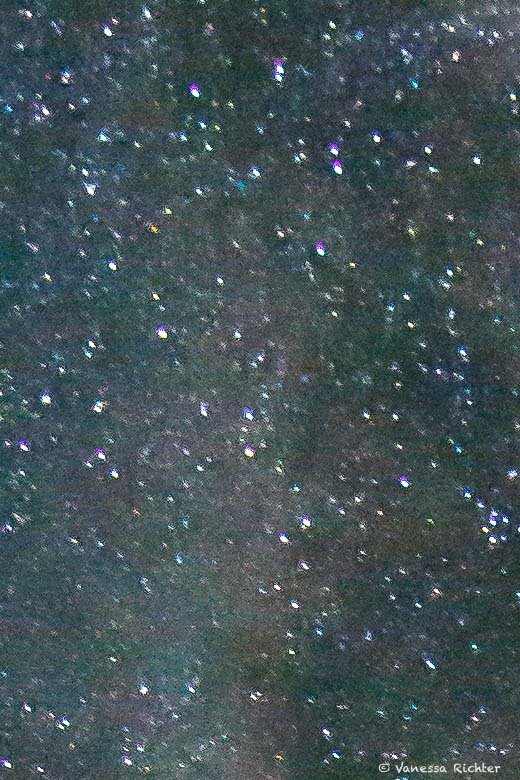
The example below showcases the result when the ISO is set to a value of ISO 1600 (in this case, with an APS-C sensor camera), producing a noticeable yet, in my view, acceptable level of graininess in the picture. No edits have been made with respect to reducing noise in the picture below.
The images below are a cropped section from the picture above to demonstrate: (a) the original photo's graininess (left photo) and (b) the possibility of reducing some of the graininess, albeit at the expense of sharpness (right photo; heavily corrected for noise for demonstration purposes).
4. Interaction of Aperture, Shutter Speed & ISO
All of the above three settings influence the lighting of the photo:
The aperture determines how large the opening is that allows light to fall onto the sensor.
The shutter speed controls how long light falls onto the sensor.
The ISO controls how much the signal is digitally amplified.
As a result, you need to set these values always in relation to each other. Decide how you want to capture your subject, which effect you want to create, and which of these settings will help you achieve it. If you have one setting fixed, you can then adjust the others accordingly.
For example, if you narrow the aperture to achieve a high depth of field (you want your picture to be as sharp as possible from front to back), this will require that you increase the shutter speed and/or the ISO value to compensate for the lower amount of light that a narrow aperture opening allows to reach the sensor. Shutter speed and ISO are a trade-off too: You may want the shutter speed to be as short as you can hold the camera still. For the ISO, you may want to keep it as low as possible to avoid graininess and noise in your photo.
It's best to try different settings in practice to get a feel for what works and what doesn’t!
5. Which Camera Mode Should I Use?
Semi-Automatic Modes
There are three options when it comes to semi-automatic modes:
A or Av-Mode (Aperture Priority Mode)
In the vast majority of situations, the Av-mode is my default mode. It allows for controlling the aperture while automatically setting ISO and shutter speed. Typically, you can still adjust the ISO manually in this mode if needed.
Why is this my default mode?
In most situations, I want to have creative control over the depth of field, but there are fewer situations where I want to take control of the shutter speed for creative reasons.
ISO, on the other hand, is more of a digital fix for lighting up the picture sufficiently and is not commonly or widely used for creative purposes (although it can be adjusted in this mode anyway).
If I encounter limitations with A(v)-mode (for example, in low-light situations), it is still a good starting point to figure out reasonable manual settings.
Tv or S-Mode (Shutter Priorty Mode)
The shutter priority mode allows you to fully control the shutter speed, while setting aperture and ISO accordingly. As for the A(v)-mode, you can still set the ISO manually if you need to. If you have a fast-moving subject, you may want to capture it still and unblurred, which requires you to set a very short shutter speed. Conversely, you can use a longer shutter speed to blur objects.
P-Mode (Program Mode)
This mode sets shutter speed and aperture automatically, while allowing you to control the ISO and other settings such as color balance (not covered in this article). To be honest, I've never felt the need to use this mode since I started photographing 9 years ago. Let me know in the comments if you use this mode and why!
Manual Mode
Experimenting with complete manual control is an excellent way to understand how these settings interact with each other and to gain a solid sense of control over them.
However, from a practical perspective, I only use it in specific situations:
Full Creative Control
Manual mode allows you to have complete creative freedom over your photography, without any limitations imposed by the camera's automatic settings. For example, imagine you want to photograph a sunset on a beach with a specific composition in mind. You may want to narrow the aperture significantly to achieve a starburst effect of the setting sun. Simultaneously, you may wish to set a long shutter speed to capture the blurred motion of the ocean. Additionally, you may prefer to keep the ISO low to maintain high photo quality. Carefully balancing all three values will help you achieve all the intended effects.
Challenging Lighting Conditions
Particularly in low-light or night situations, your camera may not provide ideal settings in semi-automatic mode.
Consistency
If you wish to maintain full consistency of settings across a series of photos, you need to use manual mode so the camera does not adjust values differently based on its own calculations.
6. Summary
Aperture controls the size of the opening for light. It is used to control the depth of field and serves other creative purposes. It also influences the brightness of the photo.
Shutter speed determines how long light reaches the sensor. It controls the overall brightness of the photo. It is an important factor for sharpness, particularly with moving subjects. Shutter speed is also employed for creative effects, such as blurring.
ISO adjusts signal amplification for brightness. It serves a primarily technical purpose in adjusting it.
—> Adjustments in one setting may require compensations in others. They need to be balanced based on desired effects and (lighting) situation.
—> Experimenting with these settings and getting hands-on experience will help you understand their impact.
I’d Love to Hear From You
How is your experience with manual and semi-automatic photography? Was this article helpful to you, and what topic should I cover next?
Share your thoughts in the comments below!